I’ve recently rediscovered my love for user stories. While some projects call for a formal, more traditional approach with strict documentation, others call for collaboration and quick results. It is this latter approach that user stories were designed for.
User stories are simple, clear, brief descriptions of functionality as described from the perspective of a user. Note: A User Story should not be mistaken for a Use Case. User stories in agile development can be useful to users and customers of the software. These user stories can then become the product backlog of an agile project.
When writing user stories I like to start with a pile of blank index cards and plenty of space to lay them out or a large board to stick them up. Ideally you will have with you a representative of your client (if this is not an internal project), like a product owner, project manager or BA. This allows for collaboration and discussion between the IT delivery team and the project owners or sponsors. I use the following as a guide for writing stories:
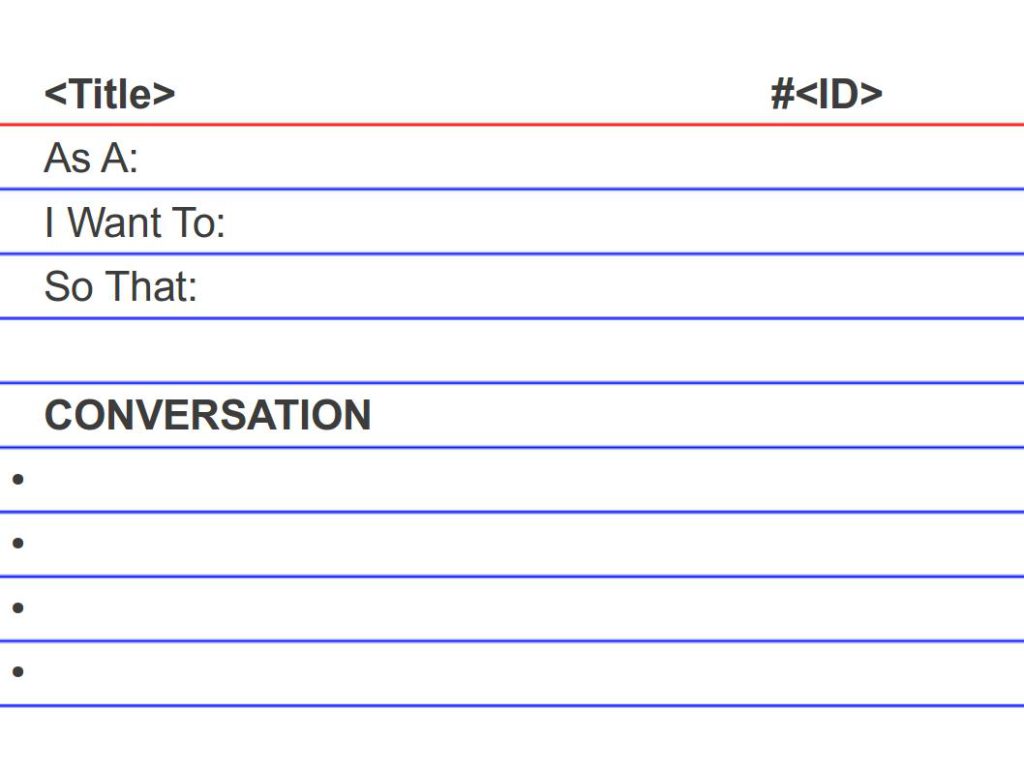
Card
The aim of the card is to capture the following three areas:
The simplicity of this template is important. I recently wrote about the Agile Manifesto, a guide to better interactions and collaborations. User stories production needs to be accessible to everyone and so this informal format helps to engage the entire project team to get involved.
Writing these out on an index card allows them to be produced quickly, discussed, adapted and moved around based on priority.
Here are some example stories that I have created for Facebook:
I Want To search by name
So That I can find my friends and associates
I Want To upload a photo
So That other users can view it
The first part of the card defines the Who, What and Why. But it’s not all the detail. This is where the conversation comes in.
Conversation
The conversation part of the story is an opportunity to elaborate on the details captured at the previous stage. In some planning meetings this will happen as the card is being written. In other cases this conversation will grow dynamically as both developers and clients understanding of the feature to be implemented improves. It allows for continuous dialogue around a feature, with the detail being recoded here.
For example, I previously used a photo upload user story, and have decide that there are actually multiple things that can happen, so we split them, and expand on them:
- There will be an upload button at the top of my profile page
- There will be a file size limit of 25MB
- The supported formats are: jpeg, png, gif and bmp
- The fields that can be edited are: caption, location, tags
- On save the image will be published
In many case a card will go through an analysis or elaboration step prior to making it into development. It is often at this stage that the conversation section will be completed. I find it important to be as verbose as possible here, providing the developer with all the detail required to complete the feature. It is at this point I ensure that the card is duplicated into an electronic format. I have seen some good spreadsheets for managing stories but I favour ticket tracking software as it allows documents to be attached. These could be process flows, business logic, designs or wireframes. I keep the paper copy of the card and reference the ticket ID on it so that there is a link between the physical asset and the electronic copy. I use the following Redmine User Story Template to help me format my tickets.
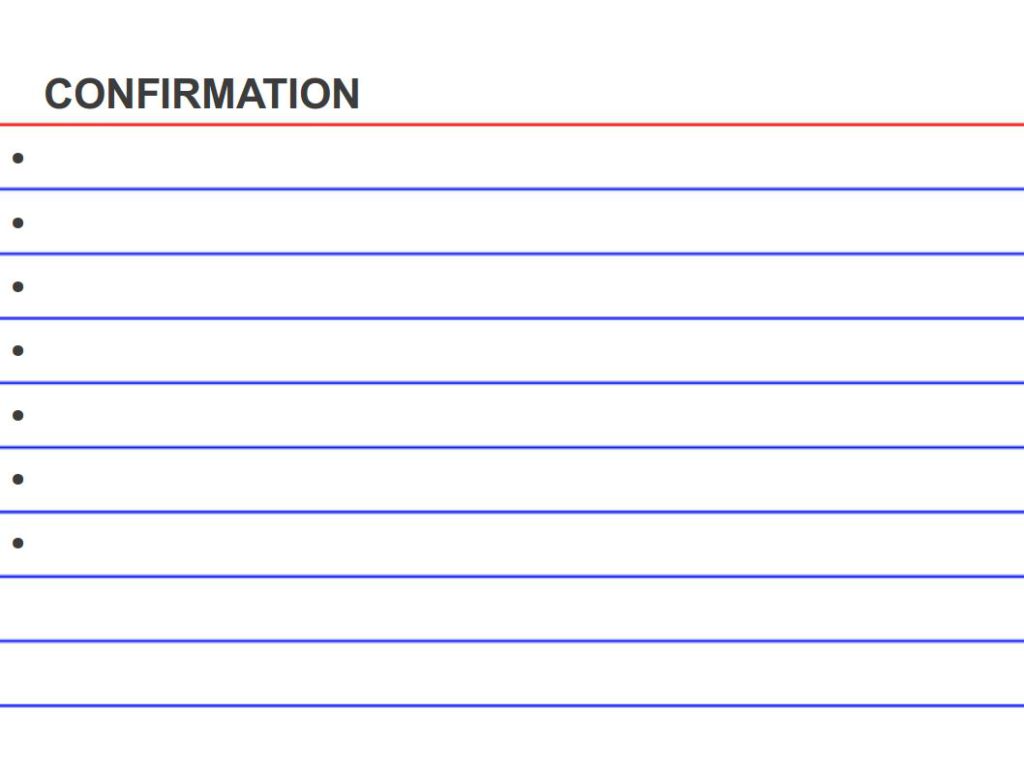
Confirmation
The confirmation part of the card is a space for a test case to go. These are steps or scenarios that help a developer test and a customer or user perform UAT. If your development team are undertaking Test Driven Development (TDD) these steps will form the basis of their test writing.
- Click the “Upload” button.
- Specify a picture file to upload.
- Check that .jpg, .png, .gif and .bmp extensions are supported.
- Check that other filetypes aren’t able to be uploaded.
- Check that files larger than 25MB results in an error.
- Click “Upload Photo”.
I try and write the confirmation parts of my story as I am having the conversation with the client or customer. Acceptance testing can allow you to limit scope of the feature and make you more confident in the estimate supplied. In the above card a requirement was captured for 4 different file formats. If your customer wants to change this in the future, agile allows for this, but until they do its part of the requirement that only 4 formats will be allowed. This allows us to define our Definition of Done, when all the conditions are met development can stop.
Conclusion
Writing user stories can be quick and productive. It removes the overhead of detailed static documentation and makes way for creativity and collaboration. However, there is a lot more to user stories then just writing cards. Previously I have written about Measuring and Monitoring Velocity and my next post will be on Story Maps.